4 minute read | Last update: August 1, 2025
Sending a document as a PDF is very convenient, until you find out it’s too big to send. Is your PDF too large to share via email? This is a familiar problem for many a Mac user.
The challenge when working with PDFs is that the more images or other interactive elements that you include, the bigger your PDF becomes. This makes it harder to share your files with friends, family, or coworkers due to email size limitations. These files can also take up a lot of storage space on your computer or drive.
The good news is that you can reduce the size of a PDF on a Mac to make it easier to share and store. With the right tools, you can do this without compromising the document's quality.
We’ll show you how to quickly and easily compress a PDF on a Mac using PDFinity’s online tool or by using Preview on your Mac, and provide you with some alternative solutions.
How to Reduce PDF Size on a Mac Without Losing Quality
PDFinity’s PDF Compressor is an easy-to-use tool that lets you quickly reduce the size of your PDF. Here’s how it works:
- Go to the tool. Here’s our PDF Compressor.
- Upload your PDF. Find the PDF you want to compress on your computer and upload it to the Compressor.
-
Compress your PDF. Click the save button. This opens a new window. Select “Compress” in the destination column.
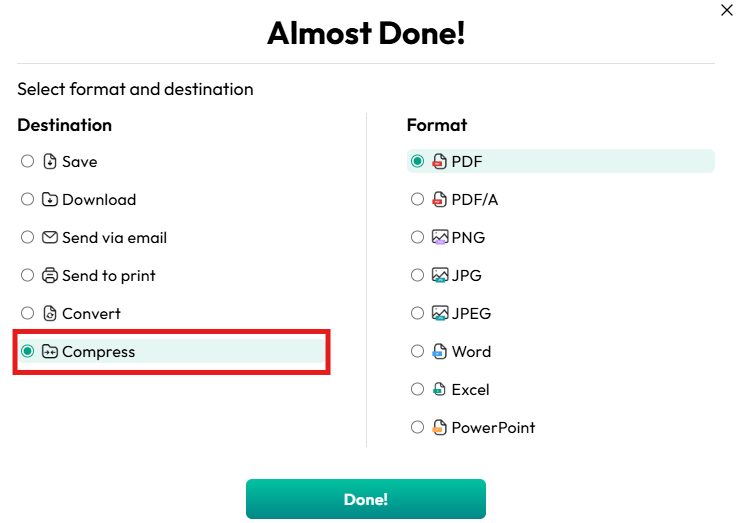
- Click Done. Now you have your compressed document.
How to Make a PDF Smaller on a Mac With Preview
Mac users can also use Preview, Apple’s built-in PDF tool, to compress their PDFs. Here’s how you can decrease the size of a PDF using Preview:
- Locate your file. Find the file you wish to compress. You may need to use “Finder” to locate it.
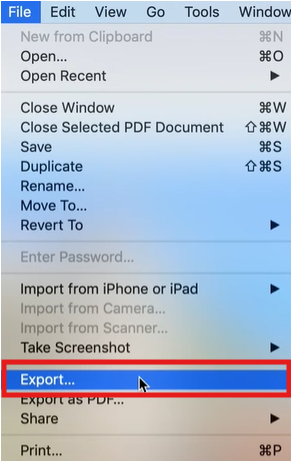
- Export the file. Under the “File” menu, you’ll find the option to “Export” the file. Click that.
- Use Quartz Filter. Find “Reduce File Size” in the submenu and click “Save”.
- Enjoy your PDF. Preview will save your compressed PDF for you.

Why Compress a PDF on a Mac?
There are a number of different reasons why you might want to reduce the size of a PDF on a Mac. The specific reasons will depend on your use case, but can include the following:
- Easy file sharing. Sharing large files can be challenging, and some platforms have file size restrictions. It can take a long time to upload or send large files, and sometimes they get compressed during transit, leading to pixelated images or broken formatting. By reducing the size of the PDF yourself, you can ensure that everything maintains the desired formatting and image quality.
- Better storage. Smaller files are easier to archive because they take up less space on drives, including both internal and external hard drives, as well as cloud storage. If you’re paying for space on a server or running out of room on your hard drives, compressing your PDFs can save you both space and money.
Alternatives to PDF Compression on a Mac
If you’re not sure whether using a PDF Compressor tool is the best way to go, you can consider trying other approaches. Before you decide which approach to take, it is helpful to understand the pros and cons of the various options.
- PDF Splitting. You can reduce the size of your PDFs by splitting them into smaller files. This way, you’re sending a few smaller files, as opposed to one large one. The upside is that you’ll have an easier time sending the smaller files. The downside is that you end up with many files to keep track of. This could mean that you misplace or lose files when saving them. Or you might forget to attach everything if you’re sending the PDFs via email. You can try out our PDF Splitting tool to break up your PDF into smaller files.
- Image quality reduction. Images within a PDF are often the parts that make the file heavier. If you reduce the size of your images before including them in your PDF, you’ll end up with a smaller file. The challenge here, though, is that images can be tricky to work with if you’re not a graphic designer. It doesn’t take much to accidentally make an image pixelated or reduce its quality to the point where you can’t make out the details.
- Zip it. Another option is to use something like MacOS’s built-in compression to reduce the size of your PDF, or ZIP it. These tools have been around for decades and, for a while, were one of the few ways to compress files. These days, using this kind of tool only really makes sense if you’re compressing multiple files, like a directory full of photos you want to share. To do this, right-click on the file, files, or directory you wish to compress. In the drop-down menu, click “Compress”. Everything you selected will be compressed into a ZIP file. To unzip the files, double-click on the zip file, and it’ll extract the files.
More Features Besides PDF Compression on a Mac
Along with allowing you to reduce the size of a PDF on your Mac effortlessly, PDFinity offers a range of tools for working with PDFs.
These include:
- Sign PDF. Easily add your signature to important PDF documents with our PDF Signing Tool.
- Delete Pages. Need to remove pages from your PDF without redoing the whole thing? We’ve got a way to help Delete Pages from a PDF.
- Organize PDF. Add pages, reorder them, or even combine multiple PDFs with our PDF Organizer Tool.
PDFinity offers a comprehensive suite of tools specifically designed to meet your PDF needs.
Share this article

